How To Remove Water Stains From Pine Table

I recently bought an antique pin kitchen table to sit in our new home. We got the table delivered and were extremely happy with it until after our first meal.

Several plates and cups that were slightly damp (not even really wet) had left large white ring marks where the table had absorbed the water.

Some details about the stained table…

  • Our table top is made from reclaimed pine floorboards
  • It has been recently fully sanded and waxed with Briwax

How to remove water ring marks

After much research and reading on the internet I performed a couple of small tests on the table before settling on a method to remove the white stains. The method below was used to successfully remove all of the water ring marks from the table. Best of all the whole table took under 5 minutes to do!

  1. Place a plain white cotton t-shirt over the affected area
  2. Pre heat a normal household iron to a low heat and ensuring the steaming function is switched off
  3. Place the iron on the t-shirt over the affected for 10-15 seconds then check to see if the mark is gone/reduced.

This worked superbly on our table, removing any trace of the many water marks we accumulated over the last 3 months. Here are some additional tips i’d offer:

  • Use an old t-shirt as some wax/stain is left on the shirt during this process
  • You may need to adjust the time the iron is used as it will be different for different bits or wood/irons
  • Best to start off with less time and build it up slowly as I guess it is possible to burn the pine if you are not careful

I intend to re-wax and polish the table several times over the next few months. I am hoping that the more layers of wax there are the more resistant to water stains the table will become.

Finally, don’t blame me if this doesn’t work or damages your table. I’ve read about others doing this with success and it worked 100% for me so if you have pine furniture with white water marks this may be worth trying.

Swimming Pool Maintenance

Looking after a swimming pool can be a daunting prospect if you have never done so. In this article we’ll break down the basic swimming pool chemistry you need to know about and try to teach you the basics maintenance that you’ll need to run on your in ground swimming pool.

Basic Pool Maintenance Tips

  • pH should be maintained between 7.2 and 7.6
  • Chlorine levels should be between 1-3 ppm, about 2.5 ppm is ideal
  • Run your pools pump for at least 8 hours per day
  • An ideal temperature for an outdoor pool is 78 degree Fahrenheit

Swimming Pool Maintenance

image by danks.de

Testing Your Swimming Pool

Ideally you should test your swimming pool everyday. As you learn how your pool reacts to both the water in your area, the weather and the amount of use your pool gets you may be able to get away with testing less frequently. Every swimming pool reacts differently so there are no set formula to any aspect of swimming pool chemistry.

When taking a sample of water always try to gather it from at least 30cm below the surface and away from the swimming pool wall.

Swimming pool test kits come in many shapes and sizes however as a minimum you should be testing the pH and chlorine levels on a regular basis. If you can maintain these two measures within the ranges stated above then you should have a relatively trouble free maintenance routine.

If you struggle to maintain one or both of these levels (pH & chlorine) or suffer other symptoms such as cloudy water you may need to take further tests or provide a water sample to a local pool specialist to diagnose the problem.

How to Add Chemicals To Your Pool

Be careful. The chemicals used in swimming pool maintenance can be dangerous if not handled correctly. By taking a few simple pieces of advice you can avoid any mishaps and will be able to enjoy your pool safely.

If you are planning on adding chlorine and acid to the pool never mix them together as this can be potentially explosive. While they can be added to the pool at the same time always mix them with water seperately (in different containers) and add them to different ends/side of the pool to prevent any nasty reactions.

The easiest way to add chemicals to your pool is by using an old watering can. Fill the watering can 3/4 full with water from the pool then add the required chemical (granules or liquid). Stir carefully (avoid splashing the water on your or your clothing) with a stick then walk around the pool pouring in the contents of the can. This will ensure the chemical dose is added in an even distribution.

After dosing your pool always leave the cover off and ensure the pump is running for at least 1 hour before anyone enters the pool. This will ensure there are no potentially harmful concentrations of chemicals in the water. Always retest the water before swimming in a recently shocked pool to ensure the chemical levels are safe for swimming (see the basic tips above). If at all possible leave 12 hours between shocking a pool and retesting and swimming.

Add The Right Amount of Chemicals To Your Pool

One thing I experienced when I first took over maintenance of a pool was getting the right measurements of chemicals to add. The dosage instructions instructions on pool chemicals (for granules anyway) usually require you to measure a particular weight of granules based on your pools capacity. It can be tricky to judge what 400 grams of acid granules looks like when pouring them from a 5kg container.

Swimming Pool Chemistryimage by Horia Varlan

To make measuring your chemicals easier, for each chemical i regularly use (acid granules, chlorine granules & alkaline granules) I have an old plastic cup that I have weighed when fully loaded  with chemical. Therefore I know 1 cup = 200gams of chlorine granules. There if i want to raise the chlorine level of my pool (11,000 m3) by 1ppm i’ll need to add about 90g of chlorine granules which is just under 1/2 cup.

Being able to add the exact amount of chemicals required will help you keep the pools chemistry exactly where you want it much more easily.

Swimming Pool Chlorine Levels

As mentioned above the ideal level of chlorine in a swimming pool is about 2.5ppm. If the pool falls below 1ppm bacteria can grow which can be potentially harmful and it is not wise to use the pool. When the chlorine levels read over 6 ppm you may experience problems with stinging eyes which can make your swimming experience unpleasant.

If your chlorine levels are too high then you’ll need to add some chlorine to the swimming pool. You can either add dissolved chlorine granules or liquid to increase the chloring levels. Also if you pool is in regular use you can keep a couple of chlorine tablets in the pools skimmer to help maintain the levels for longer.

Reducing The Chlorine Levels

Sometimes you may need to reduce the chlorine levels. On occasions you may get impatient and over shock the chlorine levels. One easy and effective way to reduce the chlorine levels in a pool is to run the hosepipe into the pool for a couple of hours. Also sunlight has the effect of killing chlorine so leaving the cover off on a sunny day will naturally reduce the chlorine levels of the water.

As a general rule if you add chlorine to a swimming pool the pH will rise. As a result it may be necessary to add acid to the pool first to reduce the pH level if you need to shock the chlorine levels.

Swimming Pool pH Levels

Again as we mentioned above the ideal pH for a swimming pool is pH7.2. This is the same pH that our eyes have is at this level. Every pool varies but you will probably find that over time your pH level will either drop or rise away from this neutral level. As the pH moves away from neutral the effectiveness of any chlorine you add can also be reduced making it crucial to maintain your pools pH at an acceptable level.

How to reduce a swimming pools pH

If your pools pH level is too high you can add some acid to reduce the pH. In an average swimming pool 400 grams of acid granules will reduce the pH by about 0.2. Of course different pools will react to different chemicals so always use the dosing levels on the instructions that come with the acid you

buy and work out the correct dose levels according to the exact capacity of your swimming pool. Likewise to increase the pH level you’ll need to add some alkaline granules.

Related Articles:

Backyard Composting Explained

Backyard composting is a great and simple way to recycle some if not all of your garden waste. All you’ll need to get started is a compost bin. Not only will you recycle your waste but you can also save money on compost by producing your own nutrient rich compost.

Positioning Your Compost Bin

Ideally your compost bin should be placed in a sunny spot on top of well drained soil. The heat from the sun will help to speed up the composting process that breaks down your organic waste while the soil base will help worms to gain access to the compost pile.

Backyard Composting

Backyard Composting

image by bunchofpants

You can place a compost bin on a concrete or paved surface however you should always add a layer of soil on the bottom first. When planting on top of soil it is a good idea to loosen the soil underneath with a fork. This will help encourage worms and useful bacteria to enter the bin.

Composting Tips

Perhaps the biggest factor of success when composting is to get a good mix of compostable materials. Ideally different types of materials should be added in thin layers of about 3-6″.

To help give your compost a boost you can buy pre bought compost starter. A much cheaper and readily available alternative is to add a little manure or even human urine to the heap to get the bacteria started!

Once your compost has started you should try and keep it moist, without being wet to help aid the bacteria. If the matter inside looks very dry add a bit of water.

Another essential composing tip for successful backyard composting is to turn your compost. Doing so ensure the matter gets broken down evenly and quickly. To do this simply take a garden fork and mix the compost inside the bin once per week.

What Can I Compost?

Vegetable & Fruit Peelings : These are excellent as they are high in both nitrogen and carbon

Tea leaves, coffee grounds & eggs shells: Again these work really well

Weeds: Most common garden weeds can be composted. For larger garden waste be sure to shred it to help speed up decomposition. Avoid certain weeds such as creeping buttercup and bindweed that will keep growing inside your bin!

Hair: Either human or pet hair can be composted!

Paper: Small amounts of paper or soft cardboard can be composted. Be sure to cut cardboard (such as egg boxes) into small pieces. Shredded paper also composts well, jsy try and avoid glossy paper such as magazines.

Grass Clippings: Grass clippings can be great for compost so long as you don’t add too much at once. As they are very high in nitrogen they can overwhelm a compost heap. A simple tip is to always try to add grass clippings at the same time as brown material such as leaves.

What Not To Compost

Meat: Do not try to compost any meat based products or scraps as this will do little apart from attract rodents.

Bread: or anything containing yeast

Cooked food: Anything that has been cooked.

iPhone – How to See How Much Data I Use

With many mobile phone companies removing their unlimited data tarriffs many iphone users are worried about how much data they use and how much they may be charged in the future.

How To Check Your iPhone Usage

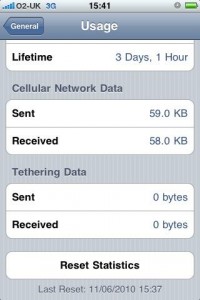
Navigate to the Settings application on your iphone then navigate to General > Usage. Down near the bottom of the screen you’ll see a Cellular Network Data – this tells you how much data you have both received and send.

iphone data usage

iphone data useage

You can reset this data by hitting the bottom of the screen. If you tariff has a monthly allowance you can simply reset the statistics every month. Below the reset button is the date the data was last reset.

A Media Player TV: Samsung 8000 LED LCD

As mentioned in my previous post I have recently been thinking about with the idea of buying a mac mini and turning it into a media centre to allow me to watch tv, play music and watch films. After doing a lot of research I finally decided on a much simpler option.
Instead of the mac mini I purchased a SAMSUNG UE40B8000 40″ 8000 Series LED LCD TV (infact even if i was going to buy a mac mini I also planned to buy an LCD TV). The great thing about this and other recent Samsung TVs is that they have what Samsung describe as ‘Media 2.0 capability’. This media 2.0 functionality includes the following four main features:
USB 2.0
This basically means you can plug an external usb storage device into the tv (such as a USB dongle or external hard drive) and play mp3s, movie files or view jpeg photographs through the tv. The built in media player has lots of codecs built in and has so far handled all of the video files I have thrown at it (avi, mpeg, wmv etc). I was a bit worried about the performance of this functionality however I have a 1TB external hard drive plugged in and have had no problems playing any of my media back. Ok so the interface is a bit clunky to navigate (especially when you have a large media collection) however it is usable and more importantly it’s reliable and plays all my media (something my windows laptop often struggled with!).
Internet@TV
This is a direct attempt by Samsung to greate a useful link between your internet and your TV, something that firms like Microsoft and Apple have been trying for years. You can connect you TV to your router via anetwork cable or by using a wireless dongle (this is about $50 extra). Content is delivered to your TV via a number of widgets, allowing you to access services such as flickr, yahoo news, yahoo weather, yahoo finance, youtube. Make no mistake you are not accessing the true internet as you would on a computer. Instead you are using available widgets or apps, in fact the experiance is very similar to the apps used on an apple iphone or ipod touch. Samsung promises the number of available widgets will increase over time. While I can’t see this being the complete future of Internet TV there are some useful apps and I can see myself using these features to check my flickr acocunt, look up the weather forcast etc.
Content Library
This is a preloaded collection of content that Samsung include on all shipped TVs. It includes a collection of example photographs, a few basic games, some recipes, fitness exercises and childrens learning activities. I believe you can connect the tv to the internet and download more content from the Samsung website. I am sure some people will find this content useflul – it may keep my niece and nephew quite for an hour or so if required. Personally I can’t see myself using this much (if at all). If i want a recipe i’ll hit google, not my samsung tv!
DNLA Wireless
This funcionality allows you to connect other devices to your TV wirelessly.  Either by using the addition wireless dongle or connecting the TV to your wireless router you can stream movies, photos or music wirelessly from your laptop or PC.I’ve not really tested this yet but I imagine it will be iusefull for things such as showing the family my holiday snaps.

As mentioned in my previous post I have recently been thinking about with the idea of buying a mac mini and turning it into a home media centre to allow me to watch tv, play music and watch films. After doing a lot of research I finally decided on a much simpler option.

Instead of the mac mini I purchased a SAMSUNG UE40B8000 40″ Series LED LCD TV (infact even if i was going to buy a mac mini I also planned to buy an LCD TV). The great thing about this and other recent Samsung TVs is that they have what Samsung describe as ‘Media 2.0 capability’ or in other words a built in media player and usb connectivity.

This media 2.0 functionality includes the following four main features:

USB 2.0

This basically means you can plug an external usb storage device into the tv (such as a USB dongle or external hard drive) and play mp3s, movie files or view jpeg photographs through the tv. The built in media player has lots of codecs built in and has so far handled all of the video files I have thrown at it (avi, mpeg, wmv etc).

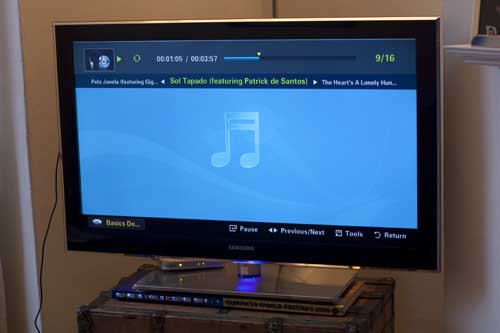
I was a bit worried about the performance of this functionality however I have a 1TB external hard drive plugged in and have had no problems playing any of my media back. Ok so the interface is a bit clunky to navigate however it is usable and more importantly it’s reliable and plays all my media (something my windows laptop often struggled with!).

Samsung TV Playing mp3s from a 1TB Hard Drive

Samsung TV Playing mp3s from a 1TB Hard Drive

Internet@TV

This is a direct attempt by Samsung to greate a useful link between your internet and your TV, something that firms like Microsoft and Apple have been trying for years. You can connect you TV to your router via a network cable or by using a wireless dongle (this is about $50 extra).

Content is delivered to your TV via a number of widgets, allowing you to access services such as flickr, yahoo news, yahoo weather, yahoo finance, youtube. Make no mistake you are not accessing the true internet as you would on a computer. Instead you are using available widgets or apps, in fact the experience is very similar to the apps used on an apple iphone or ipod touch.

Samsung promises the number of available widgets will increase over time. While I can’t see this being the complete future of Internet TV there are some useful apps and I can see myself using these features to check my flickr account, look up the weather forcast etc.

Content Library

This is a preloaded collection of content that Samsung include on all shipped TVs. It includes a collection of example photographs, a few basic games, some recipes, fitness exercises and childrens learning activities. I believe you can connect the tv to the internet and download more content from the Samsung website.

I am sure some people will find this content useflul – it may keep my niece and nephew quite for an hour or so if required. Personally I can’t see myself using this much (if at all). If i want a recipe i’ll hit google, not my samsung tv!

DNLA Wireless

This functionality allows you to connect other devices to your TV wirelessly.  Either by using the addition wireless dongle or connecting the TV to your wireless router you can stream movies, photos or music wirelessly from your laptop or PC. I’ve not really tested this yet but I imagine it will be i useful for things such as showing the family my holiday snaps.

Is This TV a Media Player?

After using this TV for a few days now it is mightily impressive. It does exactly what I wanted it too in terms of playing all of the media off my 1TB external hard drive.

Despite the huge amount of mp3s and films on my drive, navigation is fast even if it isn’t as slick an interface as something like itunes on a computer it gets the job done.

If you are thinking about a media center (either with a mac mini or windows pc) then you should definitly consider this samsung tv option.

Benefits of the Samsung 8000 over a computer based media centre:

  • No need for a computer. This solution just needs the TV and an external hard drive
  • I can control/play everything with just the TV remote control – no need for a mouse and keyboard or additional remote
  • Energy efficiency is much better as I am only powering the TV and the external hard drive (which powers down when i switch the TV off). No need to leave a pc running 24/7
  • Computer based media centres are unreliable. I used to run a windows based one and have heavily researched the mac mini option. This TV option simply works ALL the time.

Update: Another great reason I forgot to mention in the original post is that Samsung are currently offering £200 cash back on this TV.


DVD to AVI – An Easy Reliable Solution

A few years ago i went through the laborious process of  converting my extensive CD collection to mp3.

Now that hard drive storage is so much cheaper I thought it was about time I converted my existing DVD collection to digital format. As well as allowing me to save space the aim was to make my media collection much more accessible.

I have toyed with the idea of building a media center using a mac mini however instead I have decided to purchase a new samsung LCD TV which allows you to play sound and video media directly from an external hard drive via a usb connection. If I could convert all of my DVDs to avi files and put them onto an external hard drive with my mp3’s i’d be able to access all of my media directly from my television.

bitripper DVD to AVI software

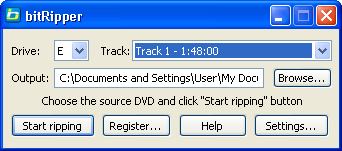
After a bit of googling i stumbled across bitripper. This is one of those great (simple to use and effective) pieces of software. Once installed you simply put a dvd in your drive and open bit ripper.The software will automatically find the dvd and display the following minimal screen.

All you need to to is to select the correct track to burn and hit go. DVD’s are made up of many tracks (the adverts, menus, extras etc). To just rip the main film on the DVD I simply select the track with the longest time from the dropdown. If required you can also change the output location and file name. Once you are done simply hit “Start Ripping” and bitripper will take care of everything else.

bitripper interface

One of the great features of bitripper is that it does everything you need it to do straight out of the box. Other solutions i looked at meant you had to first burn an image or ISO of the DVD and then convert that to an avi. Bit ripper does everything on the fly and requires no further software.

Of course you can adjust the settings manually to use different codecs, bit rates etc however I have found no need. An average DVD gets output to about a 650mb avi file and is great quality when played back on my 40″ Samsung LED TV.

The Queen’s Photographer

Well, not quite.

G20 Protest

The above shot was recently published in Her Majesty’s Inspectorate of Constabulary’s (HMIC) Review of the Policing of Public Protest, Adapting to Protest.

The shot was taken after I left work on the day of the infamous G20 protests in the City of London in the summer of 2009.  I’d popped out at lunchtime to get some shots just as the atmosphere was starting to turn nasty. By the time I left work at about 10.30pm the police had herded the protesters together and were dispersing them very slowly.

The review of policing stretches to just over 205 pages in length so in case you care the shot can be found in this document on page 78!

Olympus XA2 Review

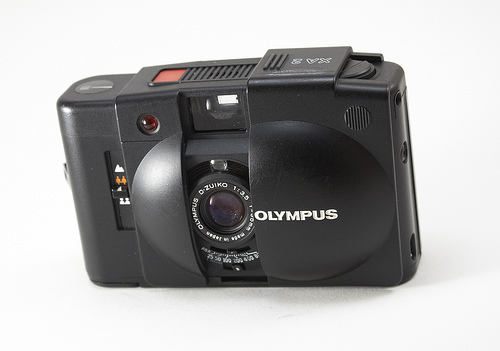
When it was first produced in the 1980’s this 35mm zone focusing compact was a technological and design breakthrough. It’s selenium light meter and clam shell design were cutting edge at the time of release and the Zuiko 35mm f3.5 was (and still is) super sharp.

Olympus XA2
Olympus XA2

After using a DSLR in quite heavily for the last year or so it has taken quite a while to get used to using such a supposedly ‘low tech’ camera. There are really only a couple of things you can do wrong when using this camera.

Once the XA2 is loaded with film you first need to select the correct ASA, something i’ve failed to do on a c0uple of occasions. You simply move the little switch under the lense to the ASA setting that matches the speed of the film you are using (available options are ASA 25, 50, 100, 200, 400 & 800).

Before taking a shot the only thing you need to worry about is setting the correct zone focus. On the front of the camera there is a switch with 3 symbols, one for each of the focus zones:

Two Heads: 1.2m – 1.8m

Two Orange Bodies: 1.2 – 6.3m

Mountains: 6.3m – infinity

Every time you reopen the clam shell to take a shot the XA2 resets back to it’s default medium zone (the two orange bodies) so be sure to change zone before shooting if your subject is close by or in the distance. Initially this can be easy to forget and the first couple of roll of film i put through the XA2 contained numerous out of focus shots.

The Olympus XA2 works by using a selenium light meter which is incredibly sensitive. When shooting you will hear two clicks: one when the shutter opens, another when it closes . You need to keep the camera perfectly still until you hear that second click, particularly if shooting in low light.

Shooting film has been a bit of a revelation for me after shooting digital for so long. I like the idea of being forced to think much harder about my shots before pressing the shutter release button. As a result I think shooting film has helped me improve as a photographer.

Cross Processed XA2 Shot

The above shot was taken using colour slide film which was then cross processed as regular negative film. The results of doing this are unpredictable, high contrast colours that can offer up some really nice surprises.

The metal body and clam shell design means that most of these cameras tend to be in great condition despite being getting on for 30 years old. The most common repair you’ll need to make (i’ve just had to do this on mine) is to replace the light seals. You’ll know you need to do this if some of your pictures have a orange/yellow line across them. This is a simple job, simply buy some replacement light seals from ebay (they only cost a couple of pounds/dollars), scrape away the gunky foam from inside and fit the new seals.

The great thing about these cameras is that they offer all of the benefits of the much more expensive Lomo LCA while doing so at bargain prices. These cameras often turn up in thrift stores or junk sales but also sell at reasonable prices on ebay. If you see one for a reasonable price, just but it.