iPhone 4s Unable to Delete Emails

I recently hadf a problem on my iPhone 4s where i was unable to delet mails from one of my mailboxes. Everytime i tried to delete an email from the inbox in question I got an error stating ‘Unable to move message to folder Trash’. Here is the simple fix that solved the issue for me.

  1. Open Settings
  2. Select Mail, Contacts, Calanders
  3. Select the mail box affected
  4. Select Advanced
  5. Select Deleted Mailbox
  6. Click on Trash (even though it may already be checked)

As soon as I did this ti was suddenly able to successfully delete emails form my inbox again. Simples!

Pruning Espalier Apple Trees

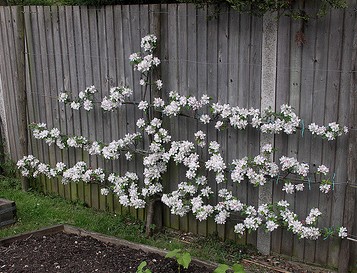
Growing Espalier fruit trees is not only a great way of growing the likes of apples and pears in a confined space but also a way to add attractive plants to your garden. A flowering espalier will make an otherwise boring wall or fence look stunning. Once initially trained espaliers don’t require much care – a quick prune once or maybe twice a year.

When to Prune an Espalier Apple Trees

Most pruning should be done in the middle of winter when the tree is dormant. Anytime between January and March should be fine. On established plants you may need to do some light pruning in late summer in order to help maximize your fruit harvest (more on this below).

Pruning To Train Espaliers

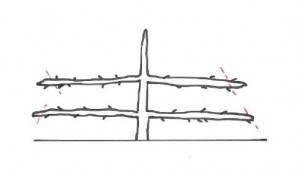
The main purpose of pruning an espalier in the frost 3-4 years of growth is to shape the tree by creating the horizontal leaders/tiers to both create an attractive tree as well as maximizing future yields of fruit.

Unfortunately there are  no short cuts and you’ll most likely be able to gain one tier of horizontals each year. Each year you’ll need to trim back the vertical leader (main stem) in order to encourage new side shoots that will form the next horizontal layer.

Pruning an Espalier Apple Tree

In order to do this prune the vertical leader just above 3 buds. One bud will be the next vertical leader while the other two will hopefully form the next horizontals (one left, one right). Pruning the main vertical leader hard in the winter encourages vigorous growth just below the cut.

Allow the 3 buds to grow throughout the summer and when big enough tie them in position. With the new branches that will form the new tier you may struggle to tie them horizontal at first as their tendency will be to grow upwards. If this is the case you may have to tie them at a diagonal angle first until they are long enough and flexible enough to be bent horizontal.

Depending on the width of your espalier you may want to encourage your horizontal leader to put on growth. To do this simply prune them just after a downward facing bud.

Pruning Espalier Tiers

The downward facing bud will grow out over the next summer to be a continuation of the horizontal tier.

Allowing an Espalier to Flower/Fruit

During this initial training phase some people prefer to remove any blossom the tree puts on in early summer. This ensure that all of the plants growth goes into producing strong leaders and roots rather than producing fruit. Whether you do this is up to you and depends how patient you are!

If allowed to set fruit, young apple trees tend to not fruit too well in the first few years. While the tree is still growing yields can be poor as energy is diverted towards root and foliage growth. Any fruit that does get produced is often bitter tasting and taken by pests. As a result many growers feel it is better to remove flowers from an espalier until the tree is virtually at it’s intended size and shape.

Espalier Apple Tree

Pruning Established Espaliers

Once your espalier is trained yearly pruning should be a relatively simple and quick process.

First you’ll need to prune back the side shoots from your horizontal tiers. Cut these back to 3 leaves from the basal cluster. Prune back growth from previously pruned side shoots to one leaf.

On more mature plants you may need to thin out the buds to prevent the trees spur system becoming too congested. This should be done between January and March.

Good Colchester Restaurants

After moving to the area I began a quest to find some good restaurants in the Colchester area. After being spoilt for choice in London it’s taken a little while to build up a selection of places we’d head back to.

Below is the selection of restaurants I’d recommend that are in or around the Colchester area.

Lucca Enoteca (Manningtree) –  (http://www.luccafoods.co.uk/)

A great little Italian restaurant in Manningtree town center. If you like great pizza then Lucca is a must visit. I’ve been there many many times and have never got past the pizza section of the menu. I’m a bit of a Pizza snob so was very pleased to find such great pizza on offer in the area.

Made the Neapolitan way in a proper wood fired oven they really are great pizzas. Oh and the other bonus is they have a nice little wine list and they’ve got Peroni on tap – what more do you need?!

Perfect for a mid-week pizza.

The Crown (Stoke-By-Nayland) – (http://www.crowninn.net/)

Posh pub grub, gastro pub, country inn, whatever you want to call it the Crown is a beaut of a pub come restaurant. Reasonable prices and great quality food are ever present on the menu which tries to focus on locally sourced produce. A great place to head for Sunday lunch – but be sure to book well in advance as it’s no secret that this is is a great place to eat.

Perfect for Sunday lunch.

Good Colchester Restaurants

image credit

The Sun Inn (Dedham) –  (http://www.thesuninndedham.com/)

In the front of the Sun there is a very traditional pub serving real ale with big fireplaces and comfy leather arm chairs. Out back there is a large  restaurant serving a mix of English and Italian food, mostly locally sourced.

Portions are generous and the  quality is high. They keep the menu quite small but it changes regularly ensuring freshness of produce. The atmosphere is warm and cozy and slightly more intimate than The Crown.

Perfect for an intimate meal out with your loved one.

On The Corner (Wivenhoe) – (http://www.tapasonthecorner.co.uk/On_The_Corner/Home.html)

This is a little gem of a place. Run by a loca couple it is a very small restaurant in a converted corner terrace house with I guess the English equivalent of a Mom & Pop feel. Rustic decor is the order of the day with old wooden school chairs and soothing Jazz played over the stereo.

The food served is an eclectic mix of tapas styl;e dishes from around the world. Morrocon meatballs, roasted Indian paneer, cold cheeses, chorizzo in wine to name just a few. The few is excellent and the prices fair. They also offer an early bird deal if you fancy an early bite.

Perfect to fill up after an afternoon walk along the coast.

Portofino’s (Colchester) –  (http://www.portofinocolchester.co.uk)

This Italian restaurant came highly recommended for a friend.  The first thing to say about it is the slightly odd feel. It is housed in a purpose built site which for want of a better description is an industrial unit from the outside. Inside there is a vast sea of tables with more upstairs. It felt a little odd being only one of two tables in there on the Tuesday evening that we went! I’m told they do very good business from Christmas parties when the atmosphere would be jumping!

The staff were friendly and very apologetic when they got my main course wrong (they brought out dover sole instead of salmon in error). Prices were quite high (£16 for my salmon) though the portions were big. The food is i’d say classically italian. It’s not super ‘refined’ but cooked authentically and pretty damn good. We’d probably head back if we were that side of town and hungry but wouldn’t make a massive effort to go back….worth a try.

Perfect for when your work colleague asks where to book the christmas party.

Mistley Thorn (Mistley) – http://www.mistleythorn.co.uk/

Being the sister restaurant to Lucca (see above) we had high hopes when we finally got round to trying the Thorn. The restaurant has a nice homely feel to it and the staff were very friendly. A good selection of beers, ales, ciders were on offer which is always a good sign. Watch out for the week night specials they offer (mussels, frites, a drink and pud all for £10.95 looked tempting…) which seem very good value.

The food actually exceeded our expectations. The Salmon Gravlax couldn’t have been better, the roasted pork was sublime and you can’t really go wrong with a hot chocolate pudding. The a la carte menu looked good value for money too if you don’t get an early week set menu. We’ll definitely be heading back to work our way through the rest of the menu.

Perfect to round off a birthday or special occaision.
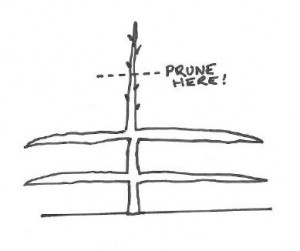
Fig Tree Care

Position – Fig trees are Mediterranean plants so choose a really well sheltered spot in the garden. Ideally somewhere near a wall that will absorb the sun’s heat during the day and radiate it at night.

Type of pots – Fig trees grow quickly. Left unchecked their roots will spread resulting in huge trees with masses of foliage and not much ripe fruit. In order to get the best crops, restrict root growth by growing in pots. Pot up each year up to a maximum size of a half barrel. Don’t worry too much about your fig tree getting root bound.

March – Time to pot on your fig tree. Aim to pot on to a pot between 5-10cm larger each year. A soil compost such as John Innes No.3 is ideal and always pot your tree 4cm deeper than it was before. Water well once repotted. Assuming the plant has more than one stem, pinch out the growing tips to help divert strength to the roots. Even if you are not potting on you should remove the plant from the pot and cut off about 25% of the rootball every 2-3 years before repotting with fresh compost.

Late March is the time pruning. Cut out any dead wood and thin the branches to allow air and light to circulate around the plant.

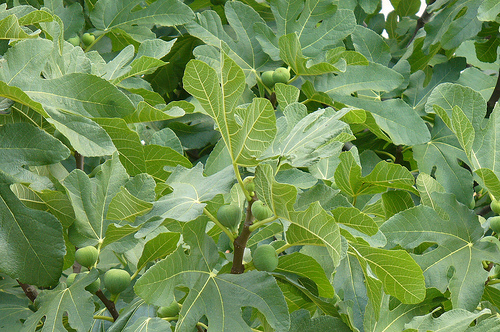
fig tree careimage by fsse8info

April – Start to feed your fig trees with a high potash feed – a liquid tomato feed is ideal. Once a week will normally suffice.

June – By now growth should be rampant. Pinch out the growing tip of your fig tree after about 5 leaves

September – In late September remove any fruit smaller than a pea. These won’t ripen and will divert  energy away from foliage growth and ultimately next years crop.

December – If pot grown move your fig tree inside to avoid the harsh frosts. A garden shed or cold greenhouse is ideal. Once the tree has gone dormant light isn’t really required. Just ensure you keep the soil moist but not too wet.

Radishes are first up

I sowed the first of this years vegetable seeds two weeks ago outside in the raised beds. I sowed spinach, radish, beetroot and carrots (along with lots of onion sets).

Radish Seedlings

Radish Seedlings

The radishes are first up thanks to the great weather we’ve been having over the last couple of weeks. I just need to remember to keep watering the beds through this warm spell to avoid the seedlings getting frazzled!

Radishes are great vegetables t grow for new gardeners as they tend to put up with most conditions, can be sown directly in the ground and grow very quickly so are great for getting a quick crop from empty parts of the vegetable plot.

Tips For Growing Basil

I have found basil to be a fickle plant to grow. If the conditions are right it grows like a weed and rewards you with vigorous growth but if the conditions are slightly wrong, then the plants tend to refuse to grow or die pretty quickly. After a couple of years without much success I think I’ve finally found the right formula to growing healthy basil.

Tips For Growing Basil

photo credit

Below is a series of tips that will hopefully help you grow basil successfully.

Tip 1: Light

In my experience basil plants tend to need light lots of indirect light. The position I have had best success with the plant at home is on a bay window sill which receives light from 3 sides yet only gets about an hour of direct sun in the morning.

Too much direct sun and I’ve found the delicate leaves easily get scorched. Ideally and East or West facing window is best. In the summer i move some of my plants out into an area in the garden that receives lots of light with dappled shade.

Tip 2: Pinching out Basil Plants

Weather you’ve grown your basil plants from seed or from taking cuttings, after a few weeks you’ll probably end up with rather spindly leggy looking plants that won’t  get you anywhere near a bowl of homemade pesto. This is where most people go wrong when growing basil. Once your basil plants reach about 15cm high pinch out the top of the plant to encourage bushier growth. Repeat every few weeks and hopefully before long you’ll have a much bushier plant that will yield many more leaves for you to harvest.

Tip 3 : Supermarket Basil

The bushy basil plants you buy in the supermarket are often tricky to look after with many people wondering how to keep them alive. They are mainly grown under artificial lights and designed to be consumed quickly rather than grown on which explains why they often die when taken home. Also if you look you’ll see they are usually several plants grown in the same pot which explains why thy are so busy.

In my opinion the best way to keep a supermarket basil plant alive is to take cuttings from it to grow more plants and use most of the plant.

Tip 4: Take Basil Cuttings

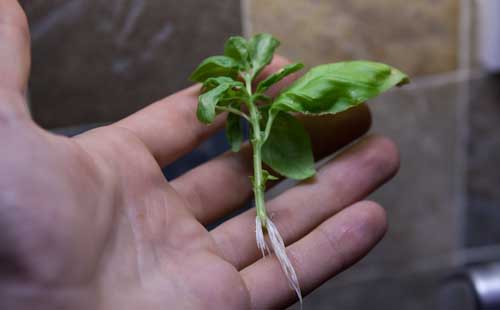
Taking cuttings from existing basil plants is pretty easy and a quick way of growing established plants. Simply snip a stem from an existing plant of about 5-15cm in length. Remove the leaves from the lower half of the stem and place in a glass of water.

Basil Cutting Sprouting Roots

Make sure the cutting is kept in lots of indirect light (see above) and hopefully after 1-2 weeks you should see some roots appearing from the end of the stem. After a further week, when the roots seem well established simply pot the plant in some regular potting compost and water regularly.

Freezing Basil Leaves

Depending on the conditions you live in you may struggle to grow your basil though the winter unless you have an indoor space that keeps fairly warm and receives lots of light. At the end of the summer, if you have a glut of basil you can easily freeze any excess by simply picking the leaves and placing in a sealed freezer bag. I simply wash the leaves after picking and dry them using a salad spinner prior to freezing.

Useful Apple Short Cuts

Below are some useful shortcuts that i have found useful after switching from a Windows PC to a Mac.

  • Page Up/Page Down: fn + left/right arrows (fn + up/down scrolls faster than just arrows)
  • Print Screen: Cmd + Shift + 3 (this saves a screen shot to the desktop
  • Repeat last action (in Office for Mac): Cmd + Y

How To Clean Wood Burner Glass

If you want to clean the glass on your wood burner don’t be fooled into thinking that you need to go out and buy some specific purpose made cleaning agent from your wood burner supplier. All you need is a bowl of water, a few sheets of newspaper, 5 minutes and a small amount of ash from inside the burner.

Obviously wait until the burner and ash inside has completely cooled before starting the clean.

1. Scrunch up a sheet of newspaper and dip in the bowl of water to moisten then dip in the ashes.

2. Rub the ash/paper on the inside of the burner door in small circular motions. You should soon start to see the soot come away from the glass, leaving a milky residue.

3. Once you have cleaned a small area use a clean piece of newspaper to rub away the residue.

4. Repeat over all of the glass door and you should be left with a nice clean burner door.

woodburner

woodburner

What Causes Soot on Wood Burner Glass?

  • Not burning wood at a high enough temperature
  • Burning wet or unseasoned wood
  • Not having enough draft or airflow when burning (open the vents slightly to resolve)

Opening a Swimming Pool

When it to opening your pool up for the summer it can be a daunting task when you remove the winter cover and reveal a horrible looking green liquid. Don’t fear opening your pool is a relatively simple task. Just follow the steps below:

Remove winter cover and install the summer one. If required net out as many leaves and debris as your can. Top up the water levels if required so that the level is halfway up the skimmer entrance..

1. Get the pump running and leave running 24 hours per day for the first week or so while carrying out the procedure below. Once the pump is running backwash your filter a couple of times.

2. Chemicals. At the heart of every well maintained swimming pool is a good chemical balance. Throughout the year you’ll need to add different chemicals to the pool in order to keep the balance right. One of the best free resources out there for calculating how much of each type of chemical you need to add to your pool is The Pool Calculator.

3. Cyanuric Acid

First of all Test Your Cyanuric Acid (CYA) levels. CYA is often referred to as Stabalizer or Conditioner. An ideal level to maintain is between 40-80. 100 is manageable however when you get up to 180ppm the effectiveness of any chlorine you add to your pool is taken away. If it is that high the only solution may be to drain a large % of the water from your pool and refill.

4. Adjust your pH level

Once your CYA level is in an acceptable range, adjust your pH so it is in the 7.4-7.6 range. If you pH is not at the correct level it can mean that any chlorine you add is not as effective as it would be, which may cause you problems as well as costing you to add more chlorine than necessary.

5. Shock the Pool

Next add a large shock of liquid chlorine and allow to circulate for 48 hours. After shocking the pool with liquid chlorine it is common for the water to a slightly milky colour. This is caused by the dead algae being suspended in the water. Don’t worry, with your pump on 24/7 you filter should clear up the water after a couple of days.

6. Kill the Algae

If the pool is still green add 2 x large bottles of algecide and allow circulate for 3-4 days.

Opening your Swimming Pool

Opening your Swimming Pool

image by titlap

7. Brush it down. Once the pool water is reasonably clear thoroughly clean the water by brushing the walls and floor then vacuuming thoroughly.

8. Adjust the water level. Top up the level of the water to be covering the skimmer hole sufficiently.

9. Check Regularly. Test the water and adjust the chlorine and pH levels to properly balance the chemistry of your pool.


Tips to Opening a Green Pool

If you follow the above procedure opening your pool should be pretty straightforward. However if your swimming pool was green to start with the process may not be so straightforward.

If the pool water is green it means there is a lot more algae in the water than when it is clear. As stated above after shocking the green pool with chlorine it will most likely go a milky/green colour. This tells you that the algae has been killed. If there is lots of dead algae suspended in your water your swimming pool filter may not be able to remove it all.

If the pool isn’t clearing after 36 hours try switching the pump off and allow the water to settle for a few hours. Then carefully vacuum any debris that settles on the bottom of the pool straight to waste (not through the filter). By doing this you should remove the majority of debris in the water enabling your filter to deal with the remainder. You may need to repeat this vacuum to waste procedure a few times.

Another thing to try at this stage is to add a water clarifier or flocculant to the water. Most pool chemical shops sell different versions of these. They work by sticking the very small debris particles together, enabling the pools filter to catch them more easily.

How to Close a Swimming Pool for Winter

Below are the basic steps you need to follow to winterize or close down your swimming pool. The process is very straightforward and shouldn’t require any specialist knowledge.

Winterize Your Swimming Pool

Winterize Your Swimming Pool

image by mknobil

1. Firstly ensure the chemical balance of your pool is correct. The two main things to worry about and adjust if required are the chlorine levels and the pH.

2. Ensure your pool is thoroughly cleaned. Take your time to clean it thouroughly brushing down the bottom and walls prior to vacuuming to ensure any algae build up is removed from the water. Complete the clean by backwashing the filter and cleaning all of the filter cages.
3. Add some winterizing chemicals to the pool. I like to use ‘Winterclear’, adding 1 litre of chemical for every 7,500 litres of pool water. After adding run the pump for 48 hours to fully circulate the chemicals.

4. Drain some water out of the pool so that the level drops 10cm below the bottom of the skimmer opening. The water level will naturally rise (via rainfall) over the winter.

5. Drain the skimmer pipe. To prevent any issues with ice add a sealed plastic bottle (with a few stones in it) into the skimmer.

6. Remove the summer cover and install the winter cover.

That’s it, your pool should now be ready to hibernate over the winter and should be in the best possible condition for when it is time to open your swimming pool in the Spring.