Aqualisa Quartz Electric Shower Turns Off After Short Pulse of Water

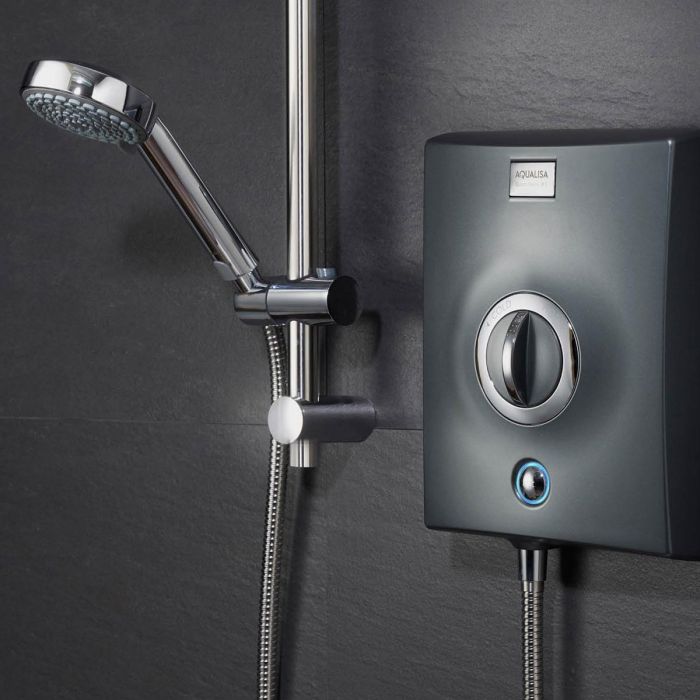
If your Aqualisa quartz electric shower turns off shortly after starting, this article will explain how you can diagnose and repair your broken shower.

Broken Quartz Shower Symptoms

After pressing the on button, the blue light briefly turns for half a second. A short pulse of water comes out of the shower head before the shower turns off. If this is our problem keep readng to get the fix.

Aqualisa Quartz Electric Shower Not Working

Why Does the Shower Turn Off

First of all turn off the power to the shower via the isolation switch that should be located  just outside of your bathroom. Even beter go to your main fuseboard and switch off the circuit that your shower is on.

Next you need to take off the shower front cover. Do this by removing three small phillips screws, one at the top of the cover and two underneath. Be careful when removing the cover which is connected to the main assembly by four small cables. Disconect the cable by unplugging the white connector block.

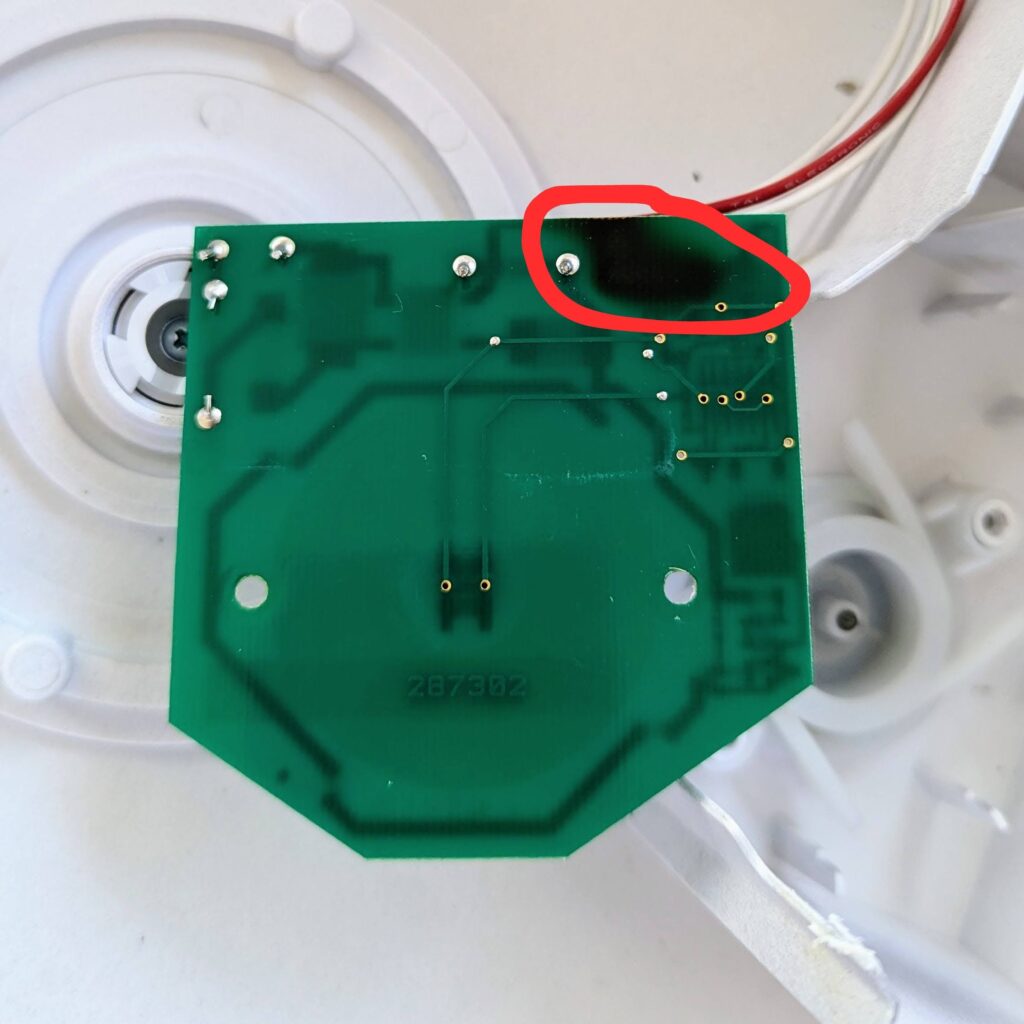
When you look inside the outer shower cover you will see a green PCB/circuit board which controls the power supply to the shower. If one corner of it appears scorched or burnt (circled red below), the issue is likely that a component on the board has failed. This appears to be a common issue.

Aqualisa Quartz Electric Shower Broken PCB

Assuming this is the issue all you need to do is to order a new shower cover part. Be usure to get the one that fits/matches the kW rating of your shower. Quartz electric showers come in thre kW ratings: 8.5kW, 9.5kW and 10.5kW. At the time of writing this cost me £120 from Aqualisa. When speaking to them they offered me a fixed price callout/fix fee of over £300. Unsurprisingly I opted to buy the cover and fit it myself given how easy it is to replace.

To fit the new cover simply connect the cables via the white connecter block. Next align the cover and fix the three grub screws back in pllace. Turn the power supply back on and the shower should now work again.

What if the PCB/Board looks fine?

If the PCB/board does not appear burnt/blown/brown then it may be an issue with the solenoid. This may mean you need to buy a new Engine assembly unit which unfortunately will be a more expensive fix and need either a plumber or electrician to fit.

I hope  this article helps resove why your Aqualisa quartz electric shower turns off shortly after turning it on.


If you found this article useful and have saved yourself the call out fee from a plumber, why not consider making a small donation to the site via paypal. You can do this via the above paypal button. This helps out massively with covering the hosting/maintenance of this site. Many thanks in advance!

If you have a problem with your Aqualisa Quartz Digital shower then this article may help.

How to Take Monstera Cuttings

This post will tell you exactly how to take Monstera cuttings. We’ll share the easiest and quickest method of propagating your Monstera Delicisoa plant. By taking cuttings and rooting them in water you’ll

Personally I find that rooting your monstera cuttings in water has the added benefit that you get a nice elegant looking cutting in a vase while you wait for it to root. In addition you’ll be able to see exactly how the root growth is going at any given point.

In terms of timing I like to take them in Spring when increasing light levels will help the new cutting soak up energy from the sun to put down to it’s new roots. That said Monstera are robust plants and I’ve had success in taking cuttings throughout the year. If doing this in the depths of Winter be sure you have a nice light place to put the cuttings.

All you need is a sharp knife and a tall (ish) vase or jar. The vase will need to be tall to support the long stem that Monstera’s typically have.

How to Take Monstera Cuttings

The fat that Monstera’s are vine like plants means there are usually plenty of good points from which you can take a cutting.

First of all you need to locate a node. This is usually just below where a leaf meets the stem. Where the plant grows out a new leaf there will be a small node just below. Often the plant will have a small nub or the start of an ariel root. This is where the roots will come from so cut just below this node.

Monstera Cutting

Once you have taken the cutting simply place it in a large jar/vase of water. Ideally use rain water. If you’re using tap water leave it to settle for 24 hours before using to allow any chlorine to burn off.

Place the cutting somewhere with lots of indirect light. I tend to use a North Easterly facing window that gets some early morning sun and lots of indirect light throughout the rest of the day.

After a week or two you will likely see a small root appearing out of the nub. Here is a photo of one of my cuttings after ~2 weeks.

Change the water once per week (if you can remember) and keep the cutting in lots of bright indirect light.

After 4-6 weeks your Monstera cutting should have a good amount of roots on it. Now is the time to pot it on in to some soil. Below is the same cutting from above after 7 weeks (note this cutting was taken in winter – summer cuttings tend to root much quicker due to the higher light levels).

Cuttings at 7 weeks


Monstera Potting Mix

I use a simple mix of regular multi-purpose compost with a few handfuls of sand and perlite. I’m not too fussy about exact measurements. The sand and perlite are there to aid drainage and aeration to the roots.

When potting the cutting up, you will need to firm down the compost around the roots to help stabilize it and keep it upright. Be firm but try to avoid damaging the roots.

As before try to keep the potted plant in lots of bright indirect light. While it adapts to having its roots in compost try not to dramatically change its environment to avoid putting the plant into shock.

Potted Monstera Cutting

And there you have it, you have created a new Monstera plant from your cutting. You can see in the above example that about a week after I potted it it began to throw out a new leaf. That’s a sure fire fine the cutting has taken well to the compost.

Now relax and enjoy your new plant!

Taotronics SoundSurge 90 Headphone Review

Welcome to this Taotronics SoundSurge 90 headphone review. Below we will run through the main pros and cons of these budget noise cancelling headphones. I’ve been using these for a few months now so thought I’d share my experiences.

One huge plus i discovered when I opened the box, is that the SoundSurge 90s come with a hard travel case. This is hugely useful when traveling and it offers good protection to the headphones when not in use. Most other budget headphones typically only come with a soft pouch so in my opinion this is a huge advantage of the 90s as to buy a similar case is likely to cost in the region of ~£10.

SoundSurge 90 Build Quality & Comfort

The build quality of these headphones seems to punch well above their price. They have a reassuringly solid feel and fold away neatly when not in use. Only time will tell but i’m confident that if they are looked after they will last well.

In terms of comfort I have no complaints. I can where these for several hours at a time and not suffer any aches or pains. The ear cups are soft and snug without being overly tight.

Active Noise Cancelling (ANC) Performance

The Active Noise cancelling (ANC) is the main reason I bought these headphones. This is what makes these headphones really superb for the money. I’m not a hardcore audiophile but the sound quality appears superb to me. While i’m working from home I tend to listen to ambient music (like this)  to help me concentrate. With the SoundSurge’s on, the sounds of my screaming ferrel young children downstairs are completely nullified. It’s like they no longer exist!

Taotronics SoundSurge 90 Headphone Review

The ANC is so good it actually removes the sound of my typing away on my keyboard. I found this a bit strange at first but soon got used to it. The building site next door can no longer be heard.

With all of these sounds gone while i’m working my ability to concentrate has increased massively. These headphones really are a game changer for my work productivity.

Another nice feature not seen on earlier versions of headphones from Taotronics is that the ANC turns off when you turn the headphones off. This greatly reduces the risk of you forgetting to turn the ANC off and draining your battery in between periods of use.

Battery Runtime is very good. I use them for between 2-5hrs a day and typically only have to charge them once per week.

I have not measured the battery life but based on my usage to date I have no reason to doubt the claim of 35hrs (with only Bluetooth on) or 30hrs music playback (with Bluetooth & ANC on). The headphones charge quickly too. A quick 5 minute charge will give you roughly 2 hours of playback which is great if you get caught out with low battery charge.

Usability

The headphones are pretty easy to operate once you’ve used them a few times. Pairing seems to work seamlessly with my phone or laptop.

It is worth remembering that if you have paired them with say your phone and you want to then pair them with your laptop you’ll first need to disconnect them from your phone. To do this simply hold the on/off button along with the down volume for a few seconds until you see a purple light. Then simply pair the headphones using the bluetooth connection settings on your laptop/phone as normal.

Charging is done via a Micro USB port. It is slightly annoying that they do not include USB-C charging on this model however the better sound quality makes these the ones to go for in my opinion.

CSoundSurge 90 Conclusion

Hopefully this Taotronics SoundSurge 90 headphone review has been useful. If so please help support the channel by using our Amazon affiliate link to purchase these headphones.

If you are in the market for a cheap set of noise cancelling headphones I would thoroughly recommend these. They aren’t going to give you studio quality hi fidelity sounds. However they will give you great ANC performance and decent sound quality that will satisfy most users needs for the fraction of the cost.

In fact I like them so much i’m just about to buy another set for my wife because she keeps borrowing mine. If you want a pair you can pick them up on Amazon here.

PIR Light Stays On Permanently | A Quick Easy Fix

If your PIR light stays on permanently it is most likely that there is an easy fix. Most common LED PIR lights have a set up routine you need to run. This switches them from ‘always on’ mode to ‘sensor’ mode where they only come on when the PIR sensor is triggered.

If you PIR light will not turn off or stays on all of the time try running the routines below. One of them should re-activate the PIR sensor in your light.

PIR LED Light Staying On Permanently

Try running the following routine.

  1. Start with the light on
  2. Turn the light off for between 1 and 2 seconds before turning on again
  3. Hopefully now the light should go off based on the internal timer

If the above routine doesn’t work try the following:

  1. Start with the light on
  2. Turn the light on for between 30 and 40 seconds before turning on again
  3. Hopefully now the light should go off based on the internal timer

If the above doesn’t work it may be that the sensor in your PIR has failed in which case it is time to replace your PIR light.

Other PIR Light Settings Worth Checking

PIR lights commonly have other settings that it is worth looking for and adjusting. Most lights will have a small dial on the rear of the unit to adjust each of the below settings.

1. Light Sensitivity
This setting simply adjusts how light or dark it needs to be before the PIR light becomes active and can come on. Once you have installed you light it is worth playing around with this setting as I have found that out of the box many PIR lights come on very early in the evening, well before dusk.

2. Time
This is simply the amount of time you want the light to stay on after it has been triggered.

3. Sensitivity of the PIR
This is perhaps the hardest setting to get right and will. usually need to be adjusted based on the location of the light. For instance PIR sensors can be very sensitive and be set off by small animals passing…which can be very common particularly in the countryside. I find most PIRs needs to have the sensitivity turned down after installation, particularly if you want to have the light trigger only when a person passes the light.

Alpkit Qark Head Torch Review

I’ve been using the Alpkit Qark head torch for just over a year now so feel like i’ve given it plenty of time to show me its strengths and weaknesses. In this review I’ll give you my honest opinion about it’s strengths and weaknesses.

What I Use the Qark Head Torch For

Before you read my opinion about this torch you should probably understand what I use it for.

I bought the Qark primarily for night time running. Initially this was on my daily commute to the train station. I live in the UK countryside and run on a mixture of footpaths, bridleways, tracks and country lanes/B roads. Some of it is through woods, some across fields and some on the road. This means all of my running (even the road section) is unlit so when it is dark it is really dark. The terrain I typically run on isn’t  the roughest you’ll find in the UK. However it is certainly varies with much of it is off road and some section a mix of stones, mud, rutted grassland etc.

Alpkit Qark Head Torch Review

Why Did I buy the Qark?

The main reasons I bought the Qark were:

  1. The ability to use both the rechargeable battery that comes with it as well as swap that out for AAA batteries as a backup. Much of my use is on part of my work commute so a backup battery solution for when i forgot to charge it was required. The most i run in a days is 2 x 12km runs which the battery can easily handle.
  2.  Alpkit quote a max brightness of 580 lumens. Given none of my running is on lit roads/paths this was a big factor in my choice.

So Is it Any Good?

Battery life has so far been great. After a year of use several times a week I have yet to run out of power mid run. As a result I haven’t had to resort to using the AAA backup batteries I faithfully carry around during my commutes. I’ve seen no major degradation int he battery over the year so no complaints on the battery front.

The brightness is fantastic. There are 5 modes (3 white and two red) to choose from. I always use the white and typically the middle one is bright enough when running off road. If conditions are particularly bad I sometimes switch it on full power.

One feature that has proved fantastic that I didn’t give much thought before buying it is the ability to change the ‘focus’ of the light beam. You can simply twist the ring around the bulb when running to alter the beams direction/size. You can adjust it to shine a brighter spot further away or to give a slightly less bright but much wider field of light. This is very useful when the terrain you are running on changes.

My initial impression when I opened the packaging was ‘wow, it’s a bit big maybe I should have got something smaller’. After a year of use I can honestly say it is incredibly comfortable and the size has never bothered me. The head band keeps the torch snug to my scalp so I barely notice it is there once i’m running.

Post run the head torch gets left by the back door where I charge it. As a result it also gets used regularly for taking the bins out, popping to the post box after dark or even used during a power cut. As a result it gets knocked about a bit and has been dropped several times. So far I’ve had no issues with reliability or build quality.

Alkit Qark Head Torch Review Summary

Would I buy it again? Certainly. It is incredibly powerful making night running on cloudy moonless nights off  road very easy. The battery services all my needs and gives me the backup of AAA batteries should I every need it. It’s comfortable and waterproof so can withstand a good soaking in the rain. Alpkit offer a 3 year guarantee on the Qark which shows they.  have faith in the build quality.


New Raised Beds Ready for Spring

After moving house a couple of years ago we were reluctant to build a full on vegetable garden straight away until we had lived in the place a bit and gotten used to the micro climate of the property.

We are in a hilly area (for SE England) so get lots of high winds. Also the garden slopes down to the North which isn’t the best for growing. Despite that we are in an elevated position so get reasonable amounts of direct sun. The sandy soil means we need to water a fair bit which should be a bit easier since we got the tap installed next to the beds.

Last year we had just two beds as an experiment and had great success growing all sorts of vegetables including spinach, beetroot, lettuce, leeks, potatoes and tomatoes. Once we were comfortable that the beds were in the right place int he garden we finally decided to bite the bullets and build another 3, taking the total number of beds to 5.

Unfortunately for me the layout we chose meant I had to move the two existing beds away from the hedge slightly so a busy afternoon off work was required to build the 3 new beds and get all 5 in the desired place! Here is the result:

Raised Beds,Veg,

The two beds at the back are 2m x 1m while the three at the front are roughly 2.5m x 1.25m and the gaps between the beds are roughly 0.8m. The timber is pressure treated 9″ x 2″ from a builders yard. It came in 4.8m lengths so there was a bit of cutting down to do.

Thankfully when we moved in there was a huge long neglected pile of compost at the bottom of the garden. There was more than enough to fill the beds with 15-20cm of compost. I’ve recently been binge watching Charles Dowding on youtube who if you don’t know him is a market gardener who promotes the no dig method. As a result I didn’t dig over any of the grass on which the raised beds were placed. Fingers crossed the vegetable can grow well enough in the compost i’ve laid on top and the weeds/grass below is smothered and doesn’t grow through!

Eventually we plan fence the whole area in to help protect the veg from rabbits. When we do this i can envisage laying some anti weed membrane down between the beds and sourcing some bark chippings on the paths between the beds. However that can wait for a few more weeks (at least!) as we’re planning to get a greenhouse installed just to the left of the beds now that spring is around the corner.

Early Cropping Radishes

One of my sons absolutely loves radishes. Given that they grow so quickly is it a great crop to grow and to succession plant. It can also be used as a stop gap plant to fill in gaps between crops or as a quick harvesting succession plant.

This year I started off early, planting the radish seeds on the 22nd February. Given the early start and the fact I may well be moving my raised beds around in 2-3 weeks time (to accommodate a new greenhouse) i’ve decided to start them off inside. I sowed 3-5 seeds in small germination cells in regular multipurpose compost. Germination started after 2-3 days.

Radish Seedlings after 5 days on a window sill!

The seedings got planted out on the 9th March, just three weeks after germination in to one of the new raised beds i’ve made. To help protect them from the cold winds I covered them in some horticultural fleece, held in place by a few bricks.

Radish Seedlings Planted Under Fleece
Radish seedlings planted out 9th March under fleece

Addidas Galaxy Trail Shoes Review

Over the last year or so I’ve transitioned off the road and I am no doing most of my running on the fields, footpaths and bridleways near where we live. At the tail end of last winter I was often struggling for grip on the muddy trails so started looking at replacing my road running shoes with some trail shoes.

I’m not a natural runner. Despite having completed a couple of marathons (slowly) I tend to pick up a lot of injuries when running. My normal pattern is to start running regularly, get competitive with myself and up either the mileage or speed too soon and pick up an injury after a few months. Then I don’t run for 6 months before i begin the cycle again.

In the past gait analysis has shown that I over pronate so I’ve tended to end up buying expensive running shoes with lots of cushioning and arch support, supplemented with orthotics for extra support.

Having read the excellent book Born to Run I started to think more about my persistent running injuries and whether the expensive, highly supportive running shoes I have been using all these years were helping at all. I thought maybe I should try and use an all purpose running shoe with less support…

The above thinking lead me to buying a pair of Adidas Galaxy Trail Running Shoes. They were cheap (£25 in a sale), looked pretty inoffensive and reasonably light.

The thing I like about these shoes compared to my usual road running shoes is you feel more in contact with the ground. I assume due to the thinner sole I can feel every little undulation in the ground. When I’m running off road this seems to give me more confidence that I am less likely to turn an ankle. I feel more in tune with the uneven surfaces I am running on.


The lower levels of support/cushioning also makes these running shoes seem lighter than my previous road shoes. Psychologically these makes me feel like I can run faster and I am lighter on my feet. They feel nice to run in.

Not only are the Galaxy’s good to run in but the styling is pretty inoffensive too. This means I can wear them when on holiday when out an about and sill have some running shoes with me when I want to nip out for an evening run.

Due to the reduced amount of support these shoes offer I’ve taken my time building up the mileage I run in them. The theory being it will give my muscles and tendons time to adapt to them and avoid injuries. So far so good. I’ve been wearing them for a few months now and I’ve yet to suffer any injuries.

All in all these shoes cost less than 1/4 of the cost of my road running shoes. The quality seems great and there are no signs of wear yet. They fee great to run in and look nice. I’ll certainly be buying them again next time i need some new runners.

What to Use for Conference Calls When Working From Home

I’ve been working from home regularly for a couple of years now. During that time I’ve been searching for the ideal kit to use to make conference calls to the office. I’ve experimented with a few different solutions and think i’ve finally found a cheap, well performing system that gets the job done.

Below are the various options i’ve tried….with the best at the bottom 😉

1. Cordless landline phone on speaker mode

This was the first and worst solution I tried. It was so bad I thought our old cordless landline was at fault so I went out and bought another newer model…which turned out to be equally poor.

The microphones on both (Panasonic) models i tried were terrible and the speaker seem to be even worse. I wasn’t sure why the Amazon reviews were so good! Conversations would tend to cut out regularly (usually at the worst time possible).

2. Routing calls to an iPhone and using the speaker

This was a much better solution. However I still found that on some calls with lots of attendees in a large conference room I couldn’t get the volume loud enough to hear all the participants. I’d find myself craning over the iphone to try and hear what was going on. The little speaker on phones is a bit tinny and not clear enough when turned up high.

3. Buying a dedicated conference call phone

These are the units we use at work and they are great. This was not something i did in the end as the high cost put me off – mainly because work wouldn’t pay for it 🙁

4. Routing calls to an iPhone and using headphones

This worked quite well for a while. A cheap pair of in ear headphones with a built in mic  allowed me to walk about when on boring calls and make a cup of tea etc. I was perfectly happy with this solution until i discovered…….

5. Routing calls to iphone and using a bluetooth speaker

Bingo! I bought one of these fantastic little speakers from Amazon and was blown away with it for playing music around the house and garden.

Simple to connect to phones and tablets, remarkably good/loud sound for it’s tiny size and a great battery life….all for about £15. I’ve since bought a few for friends as I’ve been so pleased with ours.

Bluetooth Speaker for Conference Calls

Then I had the brainwave of using this little speaker for conference calls when working from home. This enabled me to turn up the volume and hear everything that was going on, even on crappy quality lines.

For speaking I continue to use the built in microphone in my iphone – it works just fine just as long as i keep the phone not too far away form me.

This solution works really well and still enables me to be mobile during calls. If i need to get up and wander to the next room I can just crank up the volume before I go. If a cup of tea is needed I just need to carry the speaker and phone down to the kitchen.

How to Improve the Speed of your Slow Broadband Connection

Over time broadband connections can slow down, typically this is caused by fragments of data stuck on the line. Over the last couple of weeks our connection slowed down to a crawl and was suffering periods of not working all together. After a call to BT I spoke to a very helpful chap in Lancashire who ran a series of checks, confirmed there was no issue on the line and seemingly sped up the connection by doing some resets.

Below is what a BT engineer told me to do that can help clear these data fragments and speed up your connection.

  1. Disconnect your router (ethernet cable) from the BT master socket and wait 60 seconds
  2. Unplug the power lead from the back of your router and wait 60 seconds
  3. Plug the router back into the BT master socket and wait 60 seconds
  4. Reconnect your routers power lead

He told me this is likely to speed up the connection for a few weeks, possibly months depending on usage. When speaking to him he performed a series of line checks that did a similar thing.

He also mentioned that the reset button on the back of our home hub can be used as a last resort to do an even deeper reset back to the exchange. However he warned that doing this regularly can result in the exchange throttling the speed on your line so not to do this more than 2 or 3 times a year.